Integrate OBD2 data using Torque to both Home Assistant and ABRP

I wanted to use an ELM327 v1.5 adapter to integrate OBD2 data into both Home Assistant and ABRP using the Torque app. Initially I created an automation to relay the OBD2 data to ABRP via rest_command. The approach works but creates unnecessary traffic in HA. Since I use nginx as a reverse proxy for HA, I can just use ngx_http_mirror_module to mirror the GET request from Torque to both end points. This is a write-up to record the two setups in case they are useful for similar tasks.

Common

Both setups require setting up the HA Torque integration. For the Data Logging & Upload settings in the Torque app, “Webserver URL” should be the HA torque api endpoint (must be https), “Send https: Bearer Token” should be checked, and “Set Bearer Token” should be set to the HA Long-Lived Access Token. “User Email address” varies depending on the setup (see below).

HTTP mirror requests

In this setup, I use the Torque option to integrate in-car live data to ABRP. Use the token provided by ABRP as the email address for the HA Torque integration. The official integration works perfectly with an arbitrary string as the email address, but the JOHLC/ha-torque-2.0 custom integration does not, as it gives an invalid_email error.

I use the nginx-proxy Docker image in a docker-compose.yml file:

  nginx-proxy:
    image: jwilder/nginx-proxy:alpine
    ports:
      - 80:80
      - 443:443
    restart: unless-stopped
    volumes:
      - ./data/certs:/etc/nginx/certs:ro
      - ./data/nginx/conf.d:/etc/nginx/conf.d
      - ./data/nginx/vhost.d:/etc/nginx/vhost.d
      - /var/run/docker.sock:/tmp/docker.sock:ro
      - ./data/nginx/html:/usr/share/nginx/html

./data/nginx/conf.d/ha.conf:

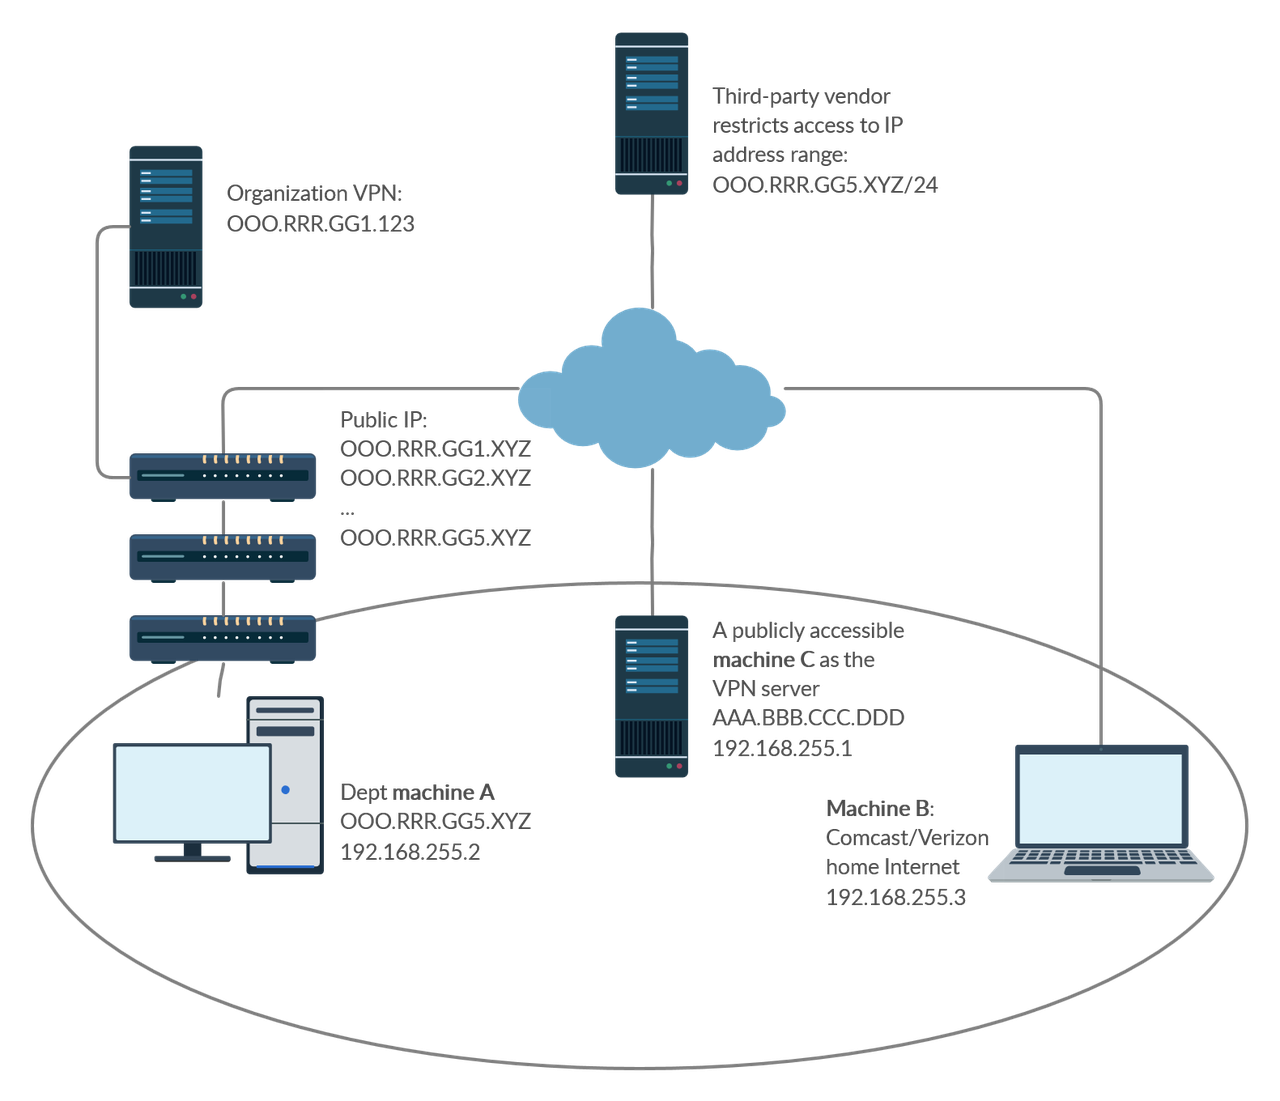
log_format vhost2 '$host $remote_addr - $remote_user [$time_local] '
                  '"$request" $status $body_bytes_sent '
                  '"$http_referer" "$http_user_agent"';

proxy_pass_header X-XSRF-TOKEN;

upstream hass.example.org {
  server 111.222.333.444:8123;
}
server {
        server_name hass.example.org;
        listen 80 ;
        access_log /var/log/nginx/access.log vhost2;
        # Do not HTTPS redirect Let'sEncrypt ACME challenge
        location ^~ /.well-known/acme-challenge/ {
                auth_basic off;
                auth_request off;
                allow all;
                root /usr/share/nginx/html;
                try_files $uri =404;
                break;
        }
        location / {
                return 301 https://$host$request_uri;
        }
}
server {
        server_name hass.example.org;
        listen 443 ssl http2 ;
        access_log /var/log/nginx/access.log vhost2;
        ssl_session_timeout 5m;
        ssl_session_cache shared:SSL:50m;
        ssl_session_tickets off;
        ssl_certificate /etc/nginx/certs/example.org.crt;
        ssl_certificate_key /etc/nginx/certs/example.org.key;
        add_header Strict-Transport-Security "max-age=31536000" always;
        location / {
                proxy_pass http://hass.example.org;
        }
        location /api/torque {
                mirror /api_torque_mirror;
                proxy_pass http://hass.example.org;
        }
        location /api_torque_mirror {
                internal;
                resolver 1.1.1.1 ipv6=off;
                proxy_ssl_server_name on;
                proxy_ssl_name api.iternio.com;
                proxy_set_header Host api.iternio.com;
                proxy_pass https://api.iternio.com/1/tlm/torque$is_args$args;
                proxy_pass_request_body on;
                proxy_set_header Authorization "";
        }
}

I use acme.sh to automate SSL/TLS certificates and Tailscale to proxy from a VPS with a public IP address to my Raspberry Pi (on T-Mobile 5G Home Internet; 111.222.333.444 above is the Tailscale IP for the Pi). To test this setup: * Verify that HA can receive the OBD2 data. Note that the Torque entities are dynamic and will disappear when HA is rebooted, but they will be recreated once new data come in. * Change “Webserver URL” to https://api.iternio.com/1/tlm/torque in the Torque app, verify that ABRP (and only ABRP) can receive the data. * Change “Webserver URL” back to HA torque endpoint in the Torque app and change all occurrences of api.iternio.com in ./data/nginx/conf.d/ha.conf to a capturing URL, e.g., from requestlens.com. Verify that the HTTP GET requests from Torque are correctly mirrored.

Home Assistant REST Relay

In this setup, you do not need to use the ABRP Torque token as the email address in the Torque app or the HA Torque integration. You also do not need the nginx mirror setup. Instead, just first make sure that the Torque data can be received by HA. Then create an automation to relay this data to ABRP using its Generic option for integrating in-car live data. We need to set up the rest_command in configuration.yaml:

rest_command:
  update_abrp:
    method: POST
    content_type: "application/x-www-form-urlencoded"
    url: >-
      https://api.iternio.com/1/tlm/send?api_key=32b2162f-9599-4647-8139-66e9f9528370&token=[ABRP Generic TOKEN]&tlm={{
        {
          "utc": as_timestamp(now()) | int,
          "soc": states('sensor.vehicle_battery_pack_state_of_charge_displayed') | float(0),
          "power": states('sensor.vehicle_inst_kpower') | float(0),
          "speed": states('sensor.vehicle_speed_kmh') | float(0),
          "lat": states('sensor.vehicle_gps_latitude') | float(0),
          "lon": states('sensor.vehicle_gps_longitude') | float(0),
          "is_charging": 1 if states('sensor.vehicle_speed_kmh') | float(0) < 1 and states('sensor.vehicle_inst_kpower') | float(0) < 0 else 0,
          "is_dcfc": 1 if states('sensor.vehicle_speed_kmh') | float(0) < 1 and states('sensor.vehicle_inst_kpower') | float(0) < 0 and states('sensor.vehicle_charger_dc_port_current') | float(0) > 10 else 0,
          "capacity": states('sensor.vehicle_battery_pack_capacity_kwh_estimated_2017_2018') | float(66.0),
          "elevation": states('sensor.vehicle_gps_altitude') | float(0) * 0.3048,
          "ext_temp": (states('sensor.vehicle_air_temp_ambient') | float(0) - 32) * 5/9,
          "batt_temp": (states('sensor.vehicle_battery_pack_temp_avg_temp') | float(0) - 32) * 5/9,
          "voltage": states('sensor.vehicle_hv_mg_voltage') | float(0),
          "current": states('sensor.vehicle_hv_current_hd') | float(0),
          "car_model": "chevy:bolt:17:66:other"
        } | to_json | urlencode
      }}

And create an automation in HA:

alias: Forward Torque Data to ABRP
description:""
triggers:
  - seconds: /5
    trigger: time_pattern
conditions:
  - condition: template
    value_template: "{{ states('sensor.vehicle_inst_kpower') | float(0) != 0 }}"
  - condition: template
    value_template: >-
      {{ (now() -
      states.sensor.vehicle_inst_kpower.last_updated).total_seconds() < 60 }}
actions:
  - action: rest_command.update_abrp

Note that we are using a different ABRP endpoint, https://api.iternio.com/1/tlm/send, a public api_key, and the unique ABRP user token. For some reason, I can only get it to work by putting all the OBD2 data in the query arguments.

Mysterious suspend when no user is logged in, Ubuntu 24.04

My Ubuntu 24.04 LTS server strangely suspends itself after 20 min. However, if I log in via Anydesk, then it stays on even if I minimize the Anydesk window and do not touch it for hours (it would enter into screensaver mode). If I log out my user and close Anydesk, it would auto suspend again. I’ve checked the following:

1) Disabled sleep / suspend / hibernation related settings in the Power settings in LxQT.

2) Checked from terminal: gsettings list-recursively org.gnome.settings-daemon.plugins.power output

3) Explicitly set relevant settings to ignore in /etc/systemd/logind.conf logind.conf

4) Nothing out of the ordinary in systemctl list-timers output

5) Nothing unusual when I followed the systemctl log journalctl -f. You can see the message `The system will suspend now! log file

UPDATE With the help of ChatGPT and Gemini, the problem is solved!

1) sudo systemctl mask sleep.target suspend.target hibernate.target hybrid-sleep.target blocks the suspend operation, even though the underlying cause is not identified.

2) Open an override file for the systemd-logind service: sudo systemctl edit systemd-logind.service and add the following to enable debug logging

[Service]
Environment=SYSTEMD_LOG_LEVEL=debug

followed by sudo systemctl restart systemd-logind.service.

Alternatively, use busctl monitor org.freedesktop.login1 to monitor requests for Suspend.

3) (2) will produce a line before “The system will suspend now!” in the log file. journalctl -b -1 | grep 'system will suspend now' -A 10 -B 10 gives

Aug 04 17:44:25 MACHINE systemd-logind[1004]: Got message type=method_call sender=:1.67 destination=:1.1 path=/org/freedesktop/login1 interface=org.freedesktop.login1.Manager member=Suspend  cookie=99 reply_cookie=0 signature=b error-name=n/a error-message=n/a

4) busctl --system list | grep ':1.67' or busctl --user list | grep ':1.67' reveals that it’s /usr/lib/unity-settings-daemon/unity-settings-daemon that have been calling org.freedesktop.login1.Manager.Suspend(). Uninstalling unity-settings-daemon eliminated the problem!

5) (1) is important because otherwise I will have to do (4) after a reboot. By that time, the D-Bus sender addresses (e.g., :1.67) will point to a different process.

Vinegar cleaning solved double clicking problems on several mice!

Problem: Many mice I have have developed the double clicking issue, including many models from Logitech, and others from Dell, Lenovo, and a few no-name brands. They were mostly with the left button: one click would register as two or holding the left button would release (registering a click) and immediately hold again. One Lenovo mouse had an issue with the right button not registering a click when you can hear a clear clicking sound.

Other problems solved by this trick:

  • A Conair hair dryer becomes very weak unless pressure is kept on the button.

  • A 1st gen Google Home Mini that started to repeatedly say “the mic is on” and “the mic is off” at times, as if the microphone switch is flipped on and off rapidly.

Solutions that don’t work: Overtime I have tried a great number of solutions from web articles and forum posts. I suspect they must have worked for some scenarios, and anything involving physically manipulating the mice (e.g., [1] & [2] below) may alleviate the symptoms initially, but none of these solutions addressed my problems for more than a few days.

  1. Cleaning debris: squeezing the buttons (perhaps while holding it upside down), shaking, and using compressed air to clean.
  2. Disassemble and bend the copper spring (image below taken from Tom’s Hardware). The idea is that the switch fails because of mechanical fatigue. However, many of my Logitech mice developed the double clicking issue in less than a year (and this solution didn’t work for more than a few days; also see below). switch internals
  3. Software solutions, e.g., using AutoHotKey to ignore rapid consecutive clicks, are very hard to tune the sensitivity threshold.

Solutions that did work: I don’t fully understand why, but [2] worked for my mice from all the different brands. The Logitech ones that failed in less than a year have worked fine for two or three years now (Corrosion developed quickly, but somehow the materials stabilized so a cleaning makes it last longer than new?)

  1. Soldering on a new switch. Did this once and it worked perfectly.
  2. Disassemble and carefully remove the switch housing to expose the copper innards (see the picture above). I found using a dulled X-Acto knife very effective in prying open the clips on the side of the switch base that hold the black plastic housing. Try not to dislodge the copper spring. They can be tricky to put back (which involves bending & twisting..) Use a Q-tip to clean the four copper contact surfaces (two on the spring, and the top and bottom surfaces on the base) with vinegar. Dry and reassemble everything.
    • Some models like Microsoft Wireless Mouse 1000 use Panasonic EVQ-P0E07K / EVQ-P0D07K style micro switches. The switches can be pried open but have to be super-glued back.

Dash cam hard wire install, no car tampering, automatically turn on/off with power button

I was installing a VIOFO A119 V3 Dash Cam on 2017 LT, but any Bolt with auto dimming mirror should work. The mirror has a switched power so the dash cam will turn on/off with the car.

The basic idea is probably similar to this post, but the pictures there are no longer available and it seemed to require splicing the wire. I found that you can just push a solid copper wire into the back of the connector without having to tamper with any existing wiring.

More details:

1) Take out the cover for the rear view mirror. Thanks to this post and this YouTube video, the process was fairly straightforward. You don’t need to take off the center piece.

2) Use a 12V->5V DC to DC converter (such as this one). Mine has stranded wires so I soldered a solid copper end to it. Stick the solid copper ends to the brown/black slot (positive) and green/white slot (negative). Wrap the exposed wires with heat shrink or electrical tape so that they don’t short out.

Image

3) And zip tie it for strain relief.

Image

4) Route the wires to the top of the cover so that the cover won’t pinch them. You can further hide the DC converter, but for me the end result looks like

this

Curious observations about efficient frontier calculations

I was using Portfolio Visualizer to try out a few efficient frontier calculations. You can run the same calculation using this link. I find it quite curious: 1) What causes Portfolio 2 to stop at σ ~ 15%? In some other portfolios I tried, the efficient frontier curves can sometimes be really short. 2) How/Why would Portfolio 2, which is a superset of Portfolio 1, cross 1 from below?

To illustrate this, I’ve attached four example runs below. Red is EF #2, while blue is EF #1. EF #2 = EF #1 + one extra asset class. The region I was talking about is where the two curves intersect. Most prominent are Run01 and Run02, where the computed curves already intersect, while for the other two runs if the EF #2 calculations were to extend to higher risk values, they would also be below EF #2. My point was that by simply setting that extra asset class to 0%, EF #2 would do at least equally well as EF #1 — what am I missing here?

The app developer kindly replied on the brief inner workings of resampled efficient frontier calculations, which is what one should expect for Monte Carlo simulations. Since I didn’t ask the permission, I’ll just point to the FAQ where some of the same references are listed. My best understanding is this: The algorithm first generates say 1000 simulated return series that include assets/asset classes from both portfolios. Each return series is different, but sampled from the same joint normal distribution with the same mean and covariance matrix as found for the historical data. Now for each of the two portfolio, the algorithm computes the efficient frontier for each return series and then averages, at each risk value, the 1000 (risk, return) data to get the combined efficient frontier.

Run1Run2Run3Run4

DIY insect killers: Additives to mix with Bifen IT

Following the suggestion here, I did a little research and found two options for bug spray: an off the shelf product or DIY. In terms of per ounce active ingredients, the off the shelf solution is about ~10 times more expensive. I’m wondering if I go the DIY route, are there any additives I should add to increase the retention/longevity of the active ingredients in the perimeter barrier, like surfactants and ammonium sulfate for glyphosate?

Answer With credits to reddit, there are a few adjuvants to mix with Bifen:

Mansfield 4000 series outdoor frost-free faucet leaking from inside the stem tube

I have a 12-in Mansfield 4000 series outdoor frost-free faucet (according to this). It’s leaking from inside the stem tube (labeled “1”) only when water is turned on. Removing the stem from the faucet, I cannot see light from the stem tube end. However, when I carefully dripped water into the stem tube, a little of that water came out from the holes labeled “2”. This makes me suspect that there might be a hole (I assume I have to replace the entire stem in this case) or a deteriorated washer inside the stem. Is Prier a new owner of the Mansfield brand? According to them, the stem should never leak this way.

faucet stem close-up

faucet stem

Answer It turns out that an o-ring (400/500 Stem End O-Ring in the diagram below) is completely absent. Since there is no leak when water is turned off, the washers should have been fine. When water is turned on, the stem end will be pushed against the thick copper part, thus closing the holes. With the o-ring missing, water drips through the seam, into the holes, and out from the handle thread.

Mansfield 400 Series Assembly Diagram

OpenVPN how to route Internet traffic through a client

My use case: I want to route all Internet traffic from machine B through machine A. However, I cannot simply install OpenVPN server on machine A as machine A is behind layers of NATs/firewalls I don’t control. My current solution is to install OpenVPN server on machine C, and have both machines A and B connect to C as clients. I’m trying to set up proper routes so that all traffic from B can be routed through A. The setup on each machine and the steps I have attempted are detailed below and my remaining problem is in the second to last paragraph.

Now, machine C runs Linux and OpenVPN server in a Docker container (https://github.com/kylemanna/docker-openvpn). With redirect-gateway def1, both client machines can connect and route traffic through the server (https://ipleak.net confirms the server IP). For the following tests though, redirect-gateway def1 is removed, while topology subnet and client-to-client are added. The server has subnet IP 192.168.255.1 and public IP AAA.BBB.CCC.DDD.

machine A runs Windows and has IPEnabledRouter=1 set in HKLM\SYSTEM\CurrentControlSet\Services\Tcpip\Parameters\, Service Routing and Remote Access set to Automatic and running, and the network adapter with Internet access set to allow sharing from the OpenVPN TAP adapter. It is assigned 192.168.255.2.

machine B runs Windows and is behind a router with IP 192.168.1.100. It is assigned OpenVPN subnet IP 192.168.255.3. The following routes are added in addition to what OpenVPN sets up automatically:

Network Destination        Netmask          Gateway       Interface  Metric
          0.0.0.0        128.0.0.0    192.168.255.2    192.168.255.3    259
        128.0.0.0        128.0.0.0    192.168.255.2    192.168.255.3    259
  AAA.BBB.CCC.DDD  255.255.255.255      192.168.1.1    192.168.1.100    291

From machine B, I can ping machine A at 192.168.255.2, but Internet traffic is still routed through the OpenVPN server (ipleak shows AAA.BBB.CCC.DDD). I tried adding a route: route add default gw 192.168.255.2 tun0, but this makes the clients unable to access Internet. The server route table typically looks like:

Destination     Gateway         Genmask         Flags Metric Ref    Use Iface
0.0.0.0         172.19.0.1      0.0.0.0         UG    0      0        0 eth0
172.19.0.0      0.0.0.0         255.255.0.0     U     0      0        0 eth0
192.168.254.0   192.168.255.2   255.255.255.0   UG    0      0        0 tun0
192.168.255.0   0.0.0.0         255.255.255.0   U     0      0        0 tun0

How can I make this work?

[EDIT] A little more context on the use case: I need to set up VPN for a division so that their users’ home computers machine B can access third-party resources that restrict access based on IP address. The access to machine A is not blocked, but there are at least two layers of NAT/firewalls up the organization, whose admins do not want to change their setup to help with incoming connections. We therefore want to devise a working solution using `machine C** that may be a VPS as the VPN server. There is an official VPN service but since it is open to certain outside members, the third-party vendor does not wish to allow its IP access.

Network Diagram

Solution In principle, the setup should be similar to RoutedLans, except that we cannot simply set machine A to handle 0.0.0.0. This SF answer explains why packets cannot be sent through another client as the gateway using the TUN interface. However, there is a workaround according to the first comment to this answer.

On machine C:

  1. Add the following to the server configuration:
topology subnet
client-to-client

route 1.0.0.0 255.0.0.0
route 2.0.0.0 254.0.0.0
route 4.0.0.0 252.0.0.0
route 8.0.0.0 248.0.0.0
route 16.0.0.0 240.0.0.0
route 32.0.0.0 224.0.0.0
route 64.0.0.0 192.0.0.0
route 128.0.0.0 128.0.0.0

push "route 1.0.0.0 255.0.0.0"
push "route 2.0.0.0 254.0.0.0"
push "route 4.0.0.0 252.0.0.0"
push "route 8.0.0.0 248.0.0.0"
push "route 16.0.0.0 240.0.0.0"
push "route 32.0.0.0 224.0.0.0"
push "route 64.0.0.0 192.0.0.0"
push "route 128.0.0.0 128.0.0.0"
  1. Set iroutes and a static IP for machine A in client-config-dir.
ifconfig-push 192.168.255.2 255.255.255.0
push "route 192.168.255.0 255.255.255.0 192.168.255.1"

iroute 1.0.0.0 255.0.0.0
iroute 2.0.0.0 254.0.0.0
iroute 4.0.0.0 252.0.0.0
iroute 8.0.0.0 248.0.0.0
iroute 16.0.0.0 240.0.0.0
iroute 32.0.0.0 224.0.0.0
iroute 64.0.0.0 192.0.0.0
iroute 128.0.0.0 128.0.0.0

On machine A:

  1. In HKLM\SYSTEM\CurrentControlSet\Services\Tcpip\Parameters\, set IPEnableRouter=1.

  2. Set service Routing and Remote Access to Automatic and make sure it is running.

  3. Set the network adapter with Internet access to allow sharing from the OpenVPN TAP adapter. It appears that sharing has to be disabled and re-enabled every time the machine is rebooted.

On machine B: make sure redirect-gateway def1 is in the client configuration.

How to rsync all folders present on the destination folder

I have two folders FolderA and FolderB as below. I want to rsync the common subfolders. For example, I can do rsync -avzP /path/to/FolderB/* /path/to/FolderA/, which will keep SubFolder1 and SubFolder3 mirrored. My question is how I can achieve the same if FolderB is the destination without explicitly --include or --exclude individual subfolders (e.g., in case there are too many of them).

` FolderA |—SubFolder1 |—SubFolder2 |—SubFolder3 |—SubFolder4

FolderB |—SubFolder1 |—SubFolder3 “**

Answer by David C. Rankin If you have a large number of folders under FolderA that you do not want to sync under FolderB, then your other option is to create a text file holding the absolute path to only those SubFolderX under FolderA you want to rsync to FolderB and then use the --no-R and --files-from=folderlist options to only rsync the wanted SubFolders. This will eliminate having to specify a large number of --filter options on the command line.

For example, you can create your folderlist with:

find /path/to/FolderA -maxdepth 1 -type d > folderlist

(note: specify the absolute path above and find will produce the folderlist file containing absolute paths)

Now edit your folderlist file and remove the parent directory (e.g. /path/to/FolderA) and any SubFolders you don’t want to sync under FolderB. You can now use the folderlist file to control which SubFolders under FolderA are sync’ed to FolderB without having to include a long list of filters on the command line. Your command line then becomes

rsync -uai -r --no-R --files-from=folderlist / /path/to/FolderB

(note: the '/' as source serves as a base for the paths contained in folderlist. You can change the -i option to control the level of information dumped to the screen, e.g. -v, etc… or remove it altogether to suppress any reporting other than errors)

(also note: when using --files-from, -a does not imply -r (recursive), so you will need to explicitly add -r if you need a recursive transfer)